
")
“]”filter”: { “nextExceptions”: “img, blockquote, div”, “nextContainsExceptions”: “img, blockquote, a.btn, ao-button”} }”>
Going outside? Read this article about the new Outside+ app, now available for members on iOS devices. Download the app.
Legs Up the Wall is considered by many to be an essential restorative yoga pose that they turn to when they feel overstimulated or want to take a nap but don’t have the time to sleep. What not everyone knows is that there are many different variations of Legs Up the Wall that provide slightly different benefits.
The following practice can be used as a 30-minute restorative yoga class focused entirely on different versions of traditional poses. You can try one or two of these variations on their own, or use the soothing sequences as an opportunity to surrender and make space for restoration of your physical, mental, and emotional well-being. Think of it as giving yourself permission to pause and rest whenever you need to.
Options start with a traditional leg-up-the-wall variation, then move to a leg-spread variation to stretch the inner thighs and hamstrings. Next, try a Deer variation to target hip internal rotation and inner thighs, before trying a Lying Pigeon Against the Wall and a Butterfly variation to target hip external rotation. These poses are suitable for anyone, regardless of yoga experience.
Practice the following sequence of poses in the evening, or any time you want to slow down. You can even try it in bed if you don’t have a headboard to get in the way.
4 variations of leg raises on the wall
No matter how many poses you try, think of it as a very effortless practice. Let a wall support you instead of trying to hold you in position. Also, try to find a time when you are completely free of distractions. Turn off your phone, dim the lights, put on some music, or whatever it takes to feel comfortable and in the mood. Once you get started, you won’t want to move much.
Take a moment to settle into each pose. If you have a blanket, you can keep it within reach if you need to cover yourself, or use an eye pillow to cover your face. If you’re using a bolster, try moving it slightly away from the wall. Feel free to use your arms as well – you can raise them over your head, place them on your stomach, or at your sides.
Whatever variation you choose to practice, try to stay in the position for around five minutes.
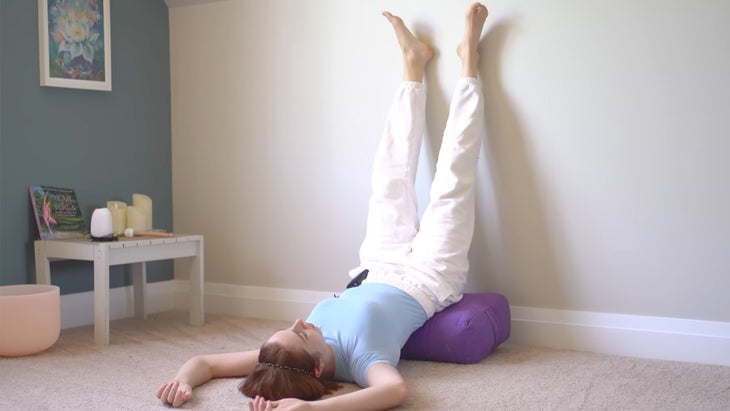
Traditional wall legs
So with that in mind, let’s move on to the traditional leg-up-the-wall variation. I use a bolster when I do leg-up-the-wall because I want my hips to be a little higher. The bolster is completely optional, though. If you don’t have a bolster at home and want to give it a try, you can stack bed pillows, couch cushions, or even a thick, folded blanket to elevate your hips a few inches off the ground.
You can also adjust the distance between the bolster and the wall a bit – I like to place my bolster very close to the wall, about an inch or two away.
To help you come into the pose, sit on a bolster or on the edge of your mat, then lift your legs and lower your hips toward the wall so that you are lowered onto the mat. Place your feet hip-width apart against the wall.
As you move through the practice, make sure you continue to breathe into your belly with each exhale.
In this first variation of the pose, stay here for about five minutes total, getting in touch with yourself and completely relaxing.
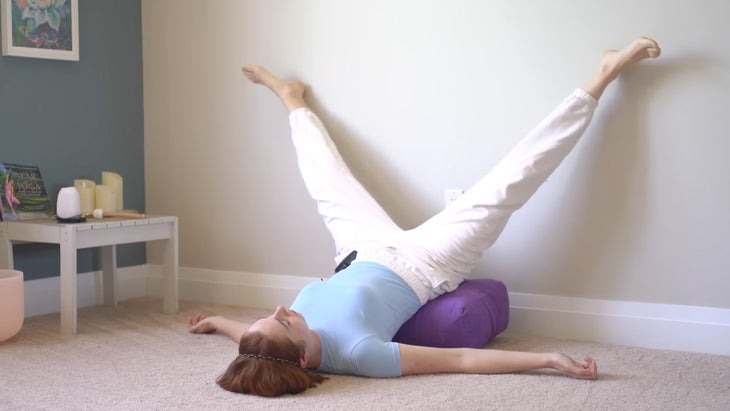
1. Leg Raise Over the Wall Variation
From a traditional “legs up the wall” pose, slide your feet toward the ground over each other. Gravity is helping you here, so there’s no need to force yourself into the pose. Just stay comfortable; your feet will naturally move apart gradually as you rest in this pose.
You can even change your arm position from the previous version if you like. Just breathe and come back to yourself.
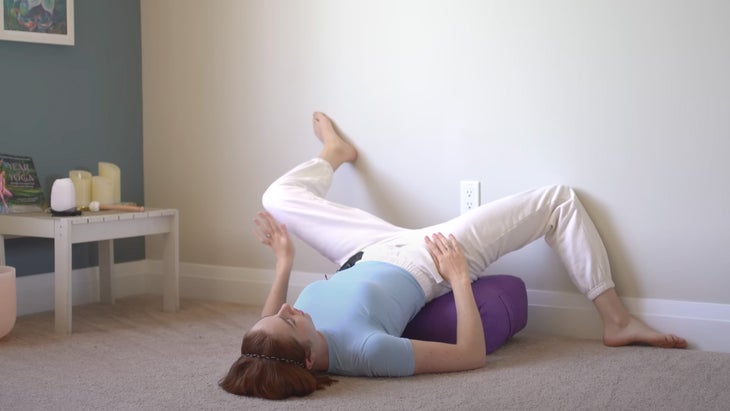
2. Wall Deer Pose Variation
From Legs-Up-the-Wall Pose, bend your knees and place your feet flat against the wall or down onto a bolster. With your knees bent, press your right knee against the wall by rotating your right hip inward and lowering your right foot to the floor. Place your left leg next to you wherever you like. Don’t pay too much attention to what’s happening with your left leg. Stay in this position and relax.
This creates a fairly strong stretch along your right inner thigh. Some people may feel the stretch in their right knee. If this causes any discomfort, gently come out of the pose and try this variation of Reclining Pigeon Pose instead.
Slowly straighten your legs, release the pose, and then repeat on the other side.
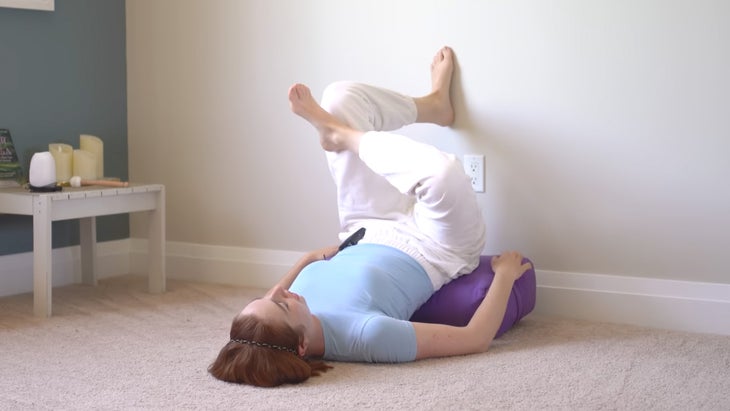
3. Wall Pigeon Pose variation
From the leg up the wall, cross your right ankle over your left knee and, keeping your left knee bent and foot flat against the wall, slowly lower yourself to a comfortable position until your shin is nearly parallel to the floor or close to it. This will externally rotate your right hip.
Once you find a comfortable position, rest in it. This is a soothing practice that helps you embrace less effort. Repeatedly tell your facial muscles, jaw, shoulders and neck to relax a little more.
When you’re ready, unpause this side and switch to the other side.
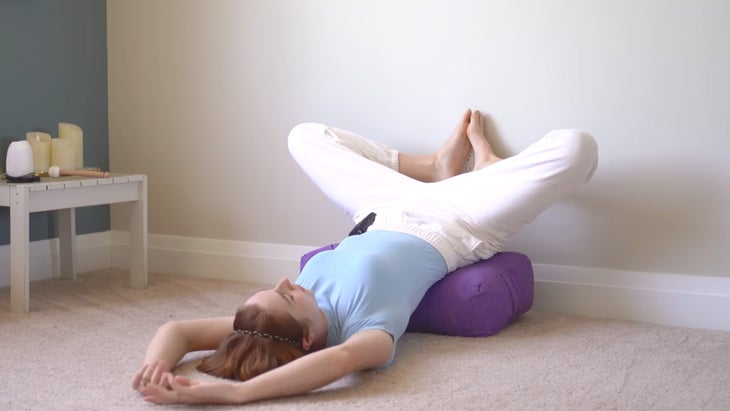
4. Wall Butterfly Pose Variation
From Legs Up the Wall, you come into a pose known in Yin Yoga as Butterfly Pose, or similar to Bound Angle Pose (Baddha Konasana). Bring the soles of your feet together and your knees apart. You may lift your heels a little higher up the wall or even slide them down.
Again, place your hands and arms in a comfortable place for you. If for any reason this pose doesn’t feel right for you, go back to the first variation we did together, the traditional “legs up the wall” pose. Take a deep breath.
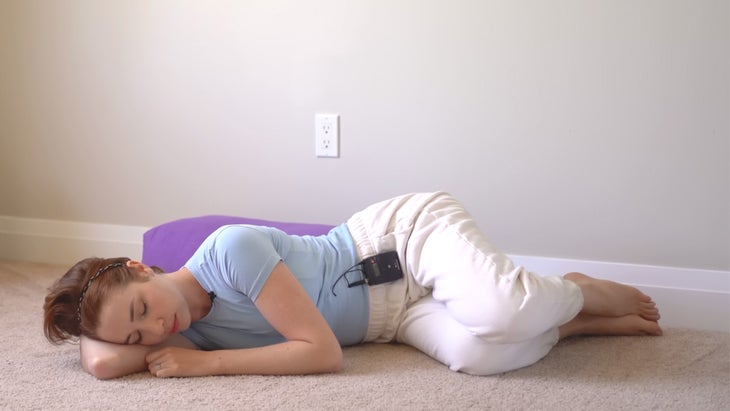
Side Shavasana
When you’re ready, bring your knees closer together and roll onto your side, away from the bolster, into a side-lying pose also known as Side Shavasana. Rest your head on your arms and rest for a moment. After releasing these inversions, ground yourself again and allow yourself to feel and integrate the benefits of this practice. If you practiced these poses in bed, you can do this final pose under the covers. Hold the position for about 10 breaths.
When you’re ready, slowly press your hands into the floor and sit up or stay in that position. Close your eyes and rest here before continuing with your day or your night.
Related: 22 Leg-Up-the-Wall Signals You Probably Haven’t Heard Of